02. Requirements
Wellcome to Flask development. Here in this bootcamp we will learn how to create Flask application using Flask framework and its extended libraries. We will use the concept of Server Side Rendering(SSR) developer.mozilla.org/en-US/docs/Glossary/SSR using Jinja for templating our application.
Tools
- Install python
www.python.org - Install & Setup Git
git-scm.com - Install Visual Studio Code
code.visualstudio.com/download
Frameworks
- Flask
flask.palletsprojects.com/en/stable/ - Flask-SQLAlchemy
flask-sqlalchemy.palletsprojects.com/en/latest/ - Flask-Security-Too
flask-security-too.readthedocs.io/en/stable/
Let's create your first Flask app.
Quick Setup
- Create virtual environment using the following command: Read More
docs.python.org/3/library/venv.html
python -m venv .env
OR
python3 -m venv .env
Here .env is a special folder which is also your virtual environment where we will install our dependencies and run our application.
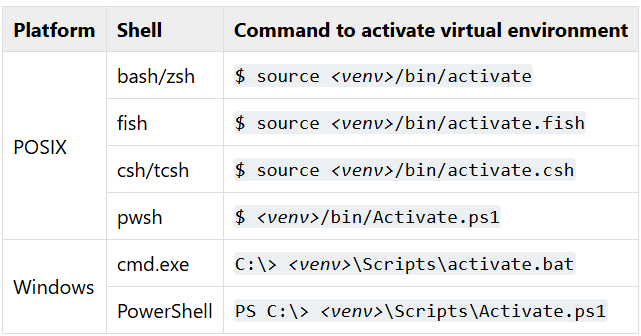
- Activate virtual environment by running the following command:
Linux/WSL/Mac
source .env/bin/activate
OR
. .env/bin/activate
Windows
.env\Scripts\activate
Here is the list of commands you can use to activate your virtual environment:
- Install flask using the following command:
pip install Flask
Flask App
Now let's create our first Flask app. Create a file with name main.py and add the following code:
python filename=main.py
from flask import Flask

app = Flask(__name__)

@app.route("/")
def index():
  return "<h1>Hello, World!</h1>"

if __name__ == "__main__":
  app.run(debug=True)
Testing it out
Now run the app using the following command:
python main.py
Note:
If you are using WSL or linux then you might have to use python3
python3 main.py
Hooray! You have created your first Flask app.
Let's commit the changes to our local git repository.
git add .
git commit -m "created flask server"